
Menus
The menu bar changes slightly with the workspace. Develop shows Layer; Graph and Canvas show Node. Commands that cannot run remain visible but disabled. Point to one to read what it does and what context enables it. Shortcut labels reflect your current bindings in Preferences.
File
- Open folder… adds a folder of photographs to the catalog and opens it.
- Recent Catalogs folds out the last ten catalogs this computer has had open, most recent first, with the one in use ticked; choose one to switch to it. Right-click an entry for Remove from this list, or choose Clear list at the bottom to empty it; both forget a path and leave every database where it is. A catalog whose file is not there right now, on an unplugged drive for instance, is shown greyed and stays in the list. While a slow drive is still answering, its entry stays usable and says so when you point at it. The full history, past the ten the menu shows, is in Catalogs and recovery.
- Catalogs and recovery… creates, opens, copies, moves, or merges the catalog database that stores library records and organization. Its recovery controls follow catalog creation, opening, and import: Catalog backup preserves the database; Recovery bundle also preserves edit graphs, takes, and user presets. Verify recovery bundle checks the bundle and referenced originals offline.
- Preferences… opens application, preview, cache, color, tethering, export, storage, models, and hotkey settings. The Models tab is described on its own page, Downloaded models. The Storage tab lists the three caches Heeler keeps on disk, thumbnails (inside the catalog file), stack and panorama proxies, and the depth and matte rasters the smart tools compute, with each one's size, a Clear button, and a Show on disk button. Clearing loses nothing you made: each cache rebuilds as you work, thumbnails as photographs are viewed, proxies on the next open of a stack or panorama, rasters the next time a tool asks. Baked selections and chosen inpaint fills are not caches, since nothing can regenerate them from their saved pointers, so they live in a folder of their own beside the rasters that Clear never enters.
- Exit closes Heeler. Edits have already been saved as they were made.
Edit
- Undo steps backward one edit.
- Redo restores an edit that was undone.
- Reset all edits returns the active photograph to its imported state and folds the sections that start folded, so the panel reads as it does for a fresh photograph. Undo restores the reset edit. With several thumbnails selected, every one of them is reset. On a linked photograph the reset lands on the whole link: a member with no override goes back to its imported state too, one with an override keeps the overridden section or dial and takes the reset around it, and a pinned member sits it out.
- Move to Trash… moves selected files into a
.trashfolder beside them. Heeler never empties it.
Select
Interactive Selection
Choose Rectangle, Ellipse, Pen, Freehand, Magnetic, Color Brush, Color Pick, Region Select, or other available selection methods. This submenu is where the Select tool and its cursor come from: choosing a method arms the tool with that method, exactly as the Finish toolbar's select button does.
Smart Selection
Click, Subject, and Sky ask a model instead of drawing geometry, and they create selections only, never layers. Click selects what you click on (Alt-click carves away); Subject and Sky each select theirs in one shot. Drawn regions combine on top of a smart selection like on any other, and Deselect drops the smart result along with everything else.
Select By
Depth Range has a depth view control beside its title, showing the depth map while you choose limits. Done and Cancel restore the depth view to its state before the dialog opened. See Select By ranges.
Luma Range…, Color Range…, Contrast…, and Depth Range… derive a selection from image content and open live controls for refining the range. They are available whenever a photograph is open: with a selection in hand the range joins it under the current New, Add, Subtract or Intersect setting, and with none a selection is started for you. Either way the selection is created without arming a tool or changing the cursor, and the marching ants show it all the same, so they work from Adjustments as readily as from Finish.
Selection operations
- Select All, Deselect, and Invert Selection change the current document selection.
- Polish Selection… opens edge refinement with Matte, Add, Remove, and Soften brush modes.
- Smooth Selection… rounds edge jitter and corners.
- Feather Selection… fades the edge over a chosen distance.
- Resize Selection… grows or shrinks the selection.
- Select Layer Pixels creates a selection from visible pixels on the active Finish layer.
- Selection from Mask bakes the active layer mask into a document selection while leaving the mask intact.
- Isolate Selection creates a Finish layer containing the photograph inside the selection.
- Fill Selection fills the selection with the current paint color on the active Finish layer.
- Remove Object rebuilds the selected area. In Adjustments it inserts the result into the Develop chain; in Finish it creates a fill result in the layer stack.
Selection behavior
- Draw from Center changes the origin behavior for rectangles and ellipses.
- Antialias gives new selections a soft one-pixel edge.
- Auto Clear on Click clears the selection when clicking outside it.
- Show Smart Clicks marks each smart click on the photograph while the tool is armed (green adds, red carves away). Turn it off if the marks feel busy; the clicks themselves still shape the selection.
Photo
Organize
- Rating assigns one to five stars or clears the rating.
- Pick, Reject, and Clear Flag change the review status.
- Add to collection, Remove from collection, and Remove from All Collections change catalog membership without moving files.
Export and edit transfer
- Add to Export Queue adds the thumbnail selection to the active batch group and opens Export.
- Quick Export… immediately renders the selection with current quick-export settings.
- Copy Edits copies the active photograph's Develop recipe.
- Paste Edits replaces the selected targets' Develop recipes with the copy. The menu identifies the source photograph.
- Edit Together opens two to four selected photographs in a grid and applies relative adjustments to all unpinned panes.
- Link Selected links two or more selected photographs: from then on an edit to any one of them lands on the others as relative changes, so a frame that started darker keeps its head start, whichever of them is open. Linking never shrinks a link: select a linked photograph and unlinked ones and Link Selected adds the newcomers to that link; select photographs from two links and it merges the two, every member of each. Joining does not copy values, each photograph keeps its own edit and moves with the link from there. Match to This Photo is the deliberate copy: it puts the open photograph's whole edit onto every other photograph in its link. Overrides hold on either side, and a pinned photograph sits it out. A linked photograph wears a link mark in the top-left corner of its thumbnail and a LINKED note in the viewer header. Unlink takes the selected photographs out of their link and drops their overrides, which only mean something inside a link; the rest stay linked. A thumbnail's right-click menu offers both, plus Select Linked, which selects every photograph in that link, and Pin out of Link, which keeps a photograph in the link but lets edits pass it by for the session. Select Linked is on this menu too while the open photograph is linked. The link marks light in accent on the open photograph's own link and stay quiet on other links in the same folder.
- Find in Thumbnails scrolls to and flashes the active photograph.
Framing
Crop / Straighten contains Straighten, free Crop, common aspect ratios, and a custom aspect entry. Choosing an aspect also arms Crop.
Combining photographs
- Stacking combines two or more photographs with the chosen stack method: HDR for brackets, Long Exposure (mean), Median to delete anything that moved, Light Trails (max), or Dark Trails (min) for dark subjects crossing a bright ground, such as birds against sky. The merge stays a recipe: its method and frame alignment can be changed later from the Stack panel, and alignment should be off when the moving subject is the picture (star trails, murmurations). The panel's frame list scrolls past ten frames and works like the ribbon: click,
Ctrl/Cmd-click, andShift-click select frames, the right-click menu removes them from the merge (the files stay put) or highlights them in the thumbnail strip, and + ADD appends more frames from the stack's own folder. Selected thumbnails can also join an existing stack from the ribbon's right-click menu: Add to Stack lists every stack in the folder. - Stitch to Panorama… aligns overlapping frames into a wide result.
- Bake to Image… renders the selected photographs and their edits into new files beside the originals. DNG is the default, keeping highlights past white and opening with fresh controls. It also works on merges and panoramas. See Bake to Image.
File location
- Relink… appears enabled when a selected source is missing and preserves its catalog data while locating the moved file.
- Move to Trash… moves the selected source files into the adjacent
.trashfolder.
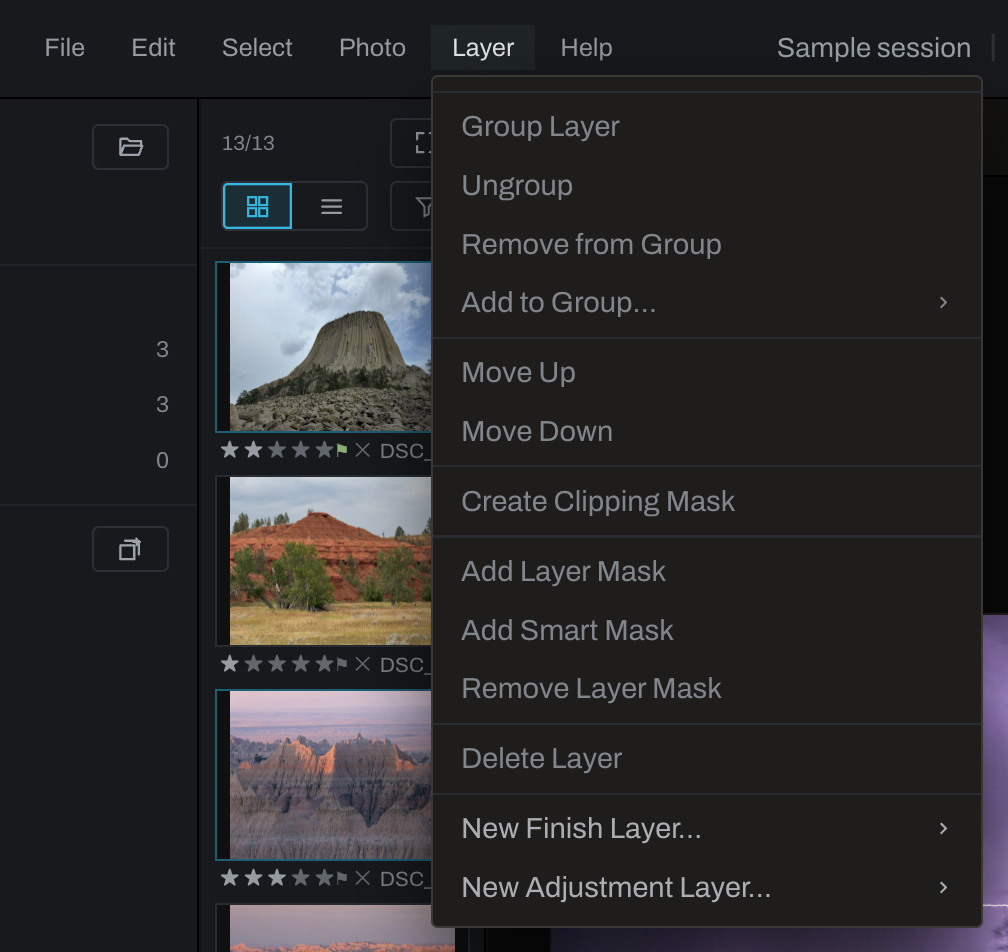
Layer: Develop workspace
The first group mirrors the active Finish layer's context menu:
- Group selected adjacent layers, ungroup a group, remove a member, or add a top-level layer to an existing group.
- Move the active layer up or down.
- Create or release a clipping mask.
- Add a painted layer mask, add a smart mask, or remove the current mask.
- Delete the active layer. Undo restores it.
New Finish Layer… adds Pixel, Smart, Adjustment, Gradient, or Fill layers. The Adjustment submenu includes Exposure, Curves, Levels, White Balance, Color, Color Balance, Black & White, Invert, and Gradient Map.
New Adjustment Layer… creates a masked local Develop adjustment using one of the available mask types, such as radial, linear, range, brush, or smart.
Rename is available from a Finish layer row's right-click menu because it edits the row in place.
Node: Graph and Canvas workspaces
- Find a Node… opens the searchable node palette.
- Category submenus add operations from the node catalog, alphabetically. The available categories and nodes reflect the current build. See the node reference.
For operations on existing nodes, use the graph context menu. See Graph canvas.
View
- Expand All Sections opens every adjustment section, including filtered sections. Option-clicking a closed section does the same.
- Collapse All Sections folds every adjustment section, including filtered sections. Option-clicking an open section does the same.
Option-Shift-click limits the gesture to sections with the same on/off state. Both commands appear in Find a Control and accept custom shortcuts. These actions do not change undo history.
Window
Heeler remembers the window as you left it: whether the Library is collapsed, the height of its Folders tree above Collections, the thumbnail strip's width and whether it shows thumbnails or a list, the workspace you were in, the panel sizes and tabs, and which pop-out windows were open. The next launch puts all of it back. This menu is the same set of switches by name, and the way home when a window has gone astray.
- Graph in its own window, Spectrums window, Takes window, Color Bend window, the Tool windows submenu (Color Wheels, Curves, Relight, Recolor, Color Tune), and Console each open or close that window; a tick shows which are out. Opening Graph requires the Graph or Canvas workspace; an open Graph window can be brought back from Develop too.
- Bring all windows back docks every pop-out into the main window. Use it when a window has been pushed off a display.
- Reset layout puts the Library, thumbnails, panels and their sizes back to a fresh launch's. The pop-outs are left as they are.
- Library and Thumbnails show or hide those panels, and Thumbnail strip as chooses thumbnails or a list.
- Adjustments sections chooses what the Adjustments panel lists: All, Pinned, On, or on the free tier Free, the same chips above the panel's sections. See Pinning and filtering.
- Develop, Graph and Canvas switch the workspace, with their keys beside them.
- App zoom scales every control, the same setting Preferences has; the photograph is never scaled.
- Full screen fills the display with Heeler, and Center main window brings the main window back to the middle of its display when it has been dragged out of reach. Center main window is available in the desktop app and disabled in the browser.
Help
- Find a Control… searches Adjustments sections, sliders, depth controls, and Finish toolbar tools, then navigates to the result. The panel scrolls the result into view and outlines it for a few seconds, holding the outline, then fading it out. The magnifying glass at the right of the Adjustments panel's All, Pinned and On row opens the same search.
- User Documentation opens the guide shipped with the app.
- About Heeler reports build and open-source information in the console.
- Check for Updates… asks the public release list whether a newer Heeler exists. If one does, the dialog shows its version and notes, and Download hands the installer to your browser, which saves it to your Downloads folder; nothing is installed until you open it. Otherwise it says you are up to date, or that the list could not be reached. Heeler also asks once at launch, showing a dialog only when a newer release exists; the General preference Check for updates at launch turns that off, and Skip this version on the launch dialog quiets one release. The check sends your IP address and platform to GitHub, where releases are hosted.
- Upgrade to Pro… shows what Heeler Pro includes and what it costs. It appears while the copy is not Pro. There is no trial: a copy is free until a license key is entered, and the free tier stays free, with no ads. Every Pro section can be opened and read on a free copy, and the Graph and Canvas workspaces can be browsed, so you can see what the upgrade adds before buying it; editing them waits for the key. The prompt also opens whenever a Pro feature is reached for; Not now quiets it for drags, and a click asks again.
- Enter License Key… appears until a key has been entered on this computer. Paste the license key from your order (it is on your order page and in the receipt email) and click Activate: the store checks it once, and this computer is Pro from then on, with no account and nothing else to set up. If the key is already in use on its full number of computers, remove it from one of them first.
- Heeler Pro License… appears once the copy is Pro. It shows which computer the key is active on, and Remove from this computer gives that seat back so the key can be entered on another machine; it asks for a second click before it does.
- Tester builds can also show Request Tester License… and Enter Tester License File…, which belong to the beta program's own licensing and are not the purchased key.
Context menus
Right-clicking a thumbnail, Finish layer, graph node, empty graph canvas, folder, or collection offers commands scoped to that object. Context menus deliberately keep unavailable operations visible where possible; their hints explain how to enable them.
