
Recolor
Recolor routes one color component into another with editable curves. It supports precise transformations that are difficult to express with a standard hue slider. On an adjustment layer it follows the layer's mask, and its Depth row reads the same plane the depth tools' layers read.
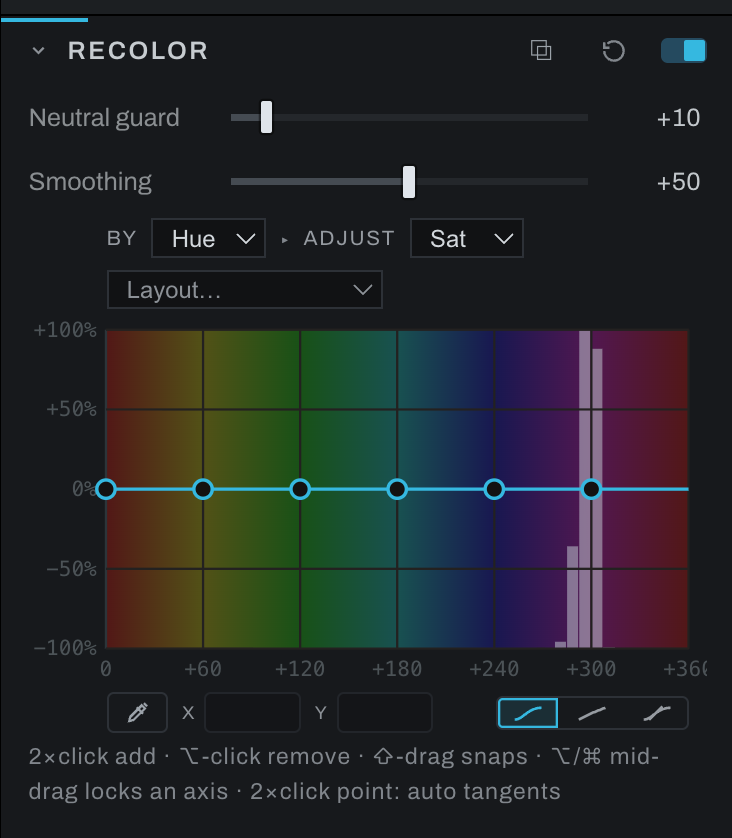
The editor's cells select a source and destination relationship, such as hue over luminance. Add and move curve points to describe how the source dimension changes across the destination range.
Beyond hue, saturation and luminance
- Depth is a fourth thing to select by. Its axis runs from NEAR to FAR across the photograph's depth plane, the same one the Fog, Key Light and Depth of Field tools read, so a curve can cool and soften the distance, or pull a subject forward, without a mask. The first point you move on a Depth cell asks Heeler to compute the plane if it has not already, and the depth tools' View depth eye sits on the Layout row while a Depth cell is up.
- Around selects by the hue of a color's surroundings rather than its own, averaged over the Around reach dial (a percentage of the frame's short side). The eye judges a color by what sits next to it, so "warm the skin only where it sits against a cool background" is one curve here. Neutral surroundings have no hue, so a color in a gray setting is left alone.
- Hue × Lum selects by both at once, as a grid instead of a curve: hue across, brightness up, one output. Drag a cell up or down to set it; Shift snaps, Alt-click or double-click clears. Where two curves multiply their separate answers, a cell answers the pair directly: protect skin in the highlights and lift the same hue in the shadows in two cells.
- Mask selects by a mask's coverage: choose any mask in the photograph (a layer's, a Color Set's, the selection) and the axis runs from 0 outside it to 100 inside; the mask is chosen from a menu on the Layout row. The point of it is the fringe: a half-covered edge pixel gets its own treatment, which "mask, then adjust" can never give it.
- Pastel is a new thing to adjust. Where Lum brightens a color at the same strength (a red stays red as it lightens), Pastel walks it toward white, the way a painter mixes white into a pigment: a red becomes pink. Negative values walk the other way, deeper and stronger. Pastel keeps the hue exactly.
- Temp, Tint and Vibrance are the Color section's dials as outputs, so they can be driven by anything on the BY side: cool the far plane by depth, warm only the skin hues, pull magenta out of the shadows by luminance, or lift vibrance where the surroundings are muted. Temp positive warms, Tint positive is magenta, and Vibrance raises the muted colors first and leaves the vivid alone.
- Spread is a second reading of the Hue → Hue curve, chosen beside it. Shift turns hues by the curve's degrees. Spread reads the curve as hue contrast: where it is high, neighbouring hues are pulled apart (+100 doubles their separation); where it is low they are merged toward one another, and the picture as a whole does not turn. "Merge the oranges, spread the greens" is one curve.
- Sat → Hue turns a color by how saturated it is: vivid colors one way, muted ones another, grays not at all. One curve for the way film dyes drift with density.
- Match places an intent instead of a point. Arm it beside the picker, click the color you have, then click the color it should become. Heeler writes the hue, saturation and exposure points that carry the first to the second, and the curves stay yours to edit. Escape between the two clicks drops the pin.
Placing points precisely
- The X and Y fields under each curve show the selected point and follow it while you drag; type a value and press Enter to place it exactly.
- Hold Shift while dragging to snap to each axis's own unit: 10° on hue, 10 points on saturation, quarter stops on the EV axis, on both the BY and ADJUST sides.
- Hold Alt or Cmd while dragging to lock the drag to its dominant direction, exactly as in Relight, and combine it with Shift to step along one axis only.
- The Layout menu is shaped by the BY axis: hue and Around offer every 60° or 30°, saturation every 50, 25, or 10, depth and mask every 25 or 10, and the EV axis borrows Relight's layouts.
Controls
- Neutral guard protects low-saturation grays and near-neutral colors from unintended shifts.
- Smoothing blends changes across the routed range.
- Picker samples the image and locates the relevant position in the editor. While it is armed, hovering the photograph rides a ghost point along the curve at the value under the cursor, so you know which point a patch belongs to before touching anything; on a hue row a neutral keeps the ghost where it last had a hue. On a Depth cell it reads the depth plane under the cursor; on an Around cell it samples as wide as the Around reach dial; the Hue × Lum grid has no picker, since its cells are the control.
Increase Neutral guard when whites, grays, or shadows acquire a cast. Use Smoothing if adjacent hues or luminance ranges separate visibly.
Hold the picker while the color or depth is read, then drag vertically to adjust the active cell. Releasing before the answer arrives cancels the drag. Changing the cell or its settings cancels a pending drag. Match uses the curves as they stand when the answer arrives, preserving edits made in the meantime; a pin never carries across a photograph, take, or preset change.